
Optimizing Your Ableton Live Export Settings
Navigating the numerous export options in Ableton Live can be a daunting task, especially when aiming for the highest quality in your final audio output. In an effort to demystify this process, I delve into the intricate world of Ableton Live’s export audio options, offering a guide to achieving the best possible sound for your music productions and answering questions I often get from my previous Ableton Export Audio video. You want to watch the older video if you want to catch up on this video before watching the extension.
Introduction to Advanced Export Settings
Building on a foundational video that explored Ableton Live’s Export Audio panel, this updated discussion goes deeper into the nuances of exporting audio. Recognizing the occurrence of lower-bit files in some productions, this video serves as an essential extension, aimed at enhancing your understanding and application of Ableton Live’s export capabilities.
Fine-tuning Export Parameters
The distinction between Render Start/Render Length and Selection is crucial for precise audio export. This segment clarifies how to optimize these settings for accurate results, ensuring that your exported audio perfectly aligns with your project requirements. Some people thought you needed to use the start and length time selection. I show a much easier way.
The Art of Exporting Stems
Exporting stems is a vital process in music production, allowing for greater flexibility in mixing and mastering stages. This section provides insights into streamlining your stem exports, ensuring consistency and quality across all tracks.
Best Practices in the Export Audio Panel
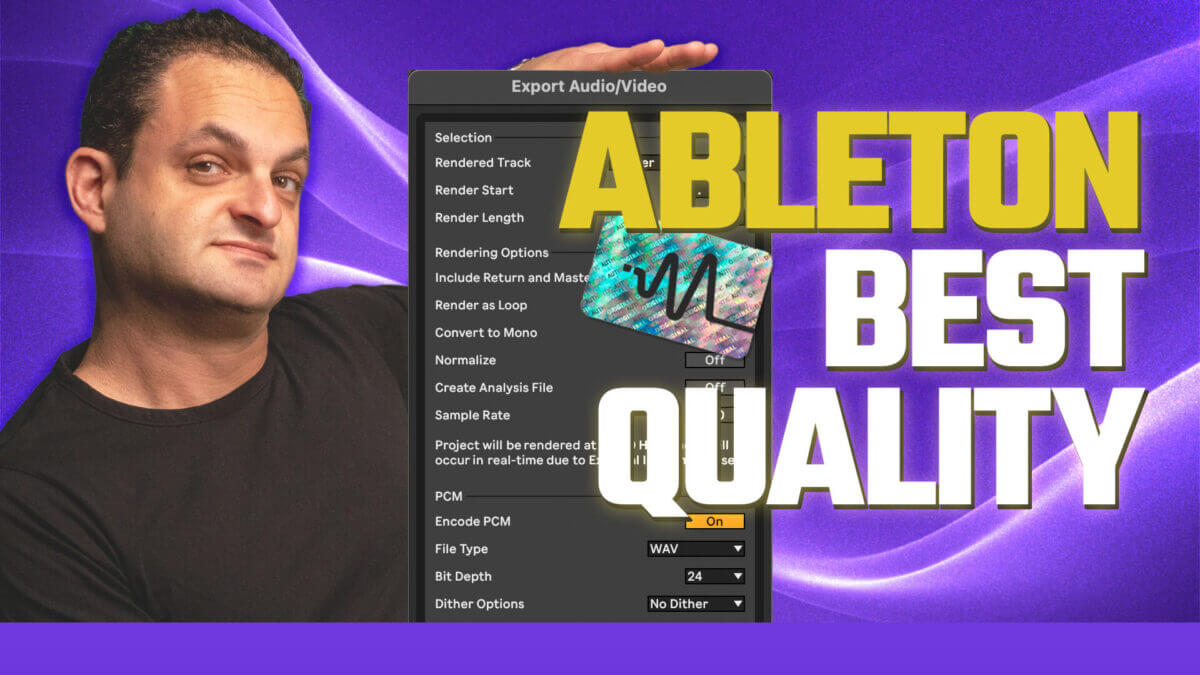
Diving into the Export Audio Panel, we uncover the best practices that lead to superior audio quality. From selecting the right bit depth and sample rate to understanding the implications of various file types, this guide emphasizes settings that professionals use to achieve clarity and depth in their audio exports.
Understanding Bit Depth, Sample Rate, and File Types
The choice of bit depth and sample rate significantly affects the quality of your exported audio. Alongside this, selecting the appropriate file type plays a critical role in the preservation of audio integrity. This section breaks down these concepts, providing a clear path to making informed decisions during the export process. If you want to learn more about bit depths and sample rates visit this page.
The Role of Dithering in Exporting
Dithering might seem like a minor detail, but it can have a profound impact on the final sound quality, especially when downsampling. Learn when and how to apply dithering to maintain the integrity of your audio during the export process. I discuss everything you need to know about dither in an older post.
Incorporating Video into Your Audio Projects
For projects that integrate audio with video, understanding the export settings relevant to multimedia is essential. This part of the discussion highlights how to optimize your audio export settings in tandem with video content, ensuring synchronization and quality are maintained across formats.
Thanks for watching this video on the best settings for Ableton’s Export audio functions. Make sure to subscribe on YouTube for weekly tips and tricks.